Hardware Requirements:
LTPP3G2 board
Tibbits #39_1/39_2/39_3/39_4, #00_3
Power adaptor to power LTPP3G2
USB Type-C-to-A cable
Router and ethernet cable for Network LAN
SD-Card/USB stick (greater than 8GB preferable)
Software Requirements:
Ubuntu Image file of LTPP3G2 board
VS Code pre-installed with extensions like "Remote SSH", "python" and "python extension pack"
IO Ninja pre-installed to access LTPP3G2 over Serial console while uploading Ubuntu image
Ubuntu Image:
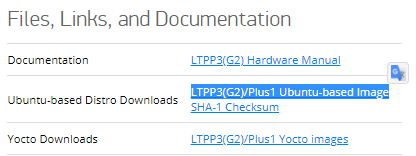
You will get the stable Ubuntu image from Tibbo's website on the detailed description webpage of the LTPP3G2 board under the section called "Files, Links, and Documentation" here https://tibbo.com/store/tps/ltpp3g2.html.
Click the hyperlink shown in the snapshot (highlighted) and allow the download of the Ubuntu image on your computer.
Copy the Ubuntu image to a USB stick or SD Card and connect your computer and LTPP3G2 using USB Type-C-to-A cable use the Serial console session on the IO Ninja application for access.
Apply the jumper on CN11 and insert the USB/SD Card and press the "Reset" button on LTPP3G2.
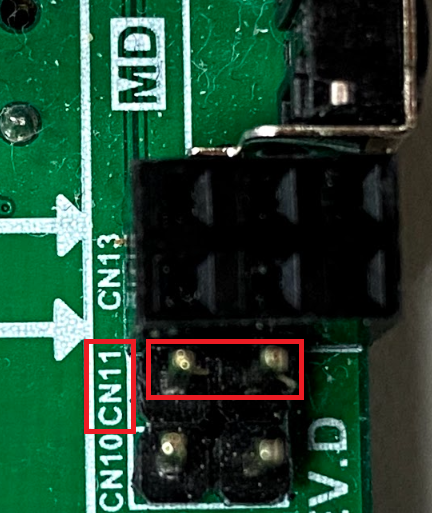
The image file will start to upload on eMMC storage, you can see the console logs in the IO Ninja Serial session window and when it says "ISP all: Done" it means the upload is successful and you can reboot the board by removing the jumper CN11.
The default username and password of the ubuntu image is "ubuntu" and "ubuntu" respectively.
After initial access over the serial console, you can check the file system of the Ubuntu image and shut down the LTPP3G2 board through the command-line interface, attach the Tibbits #00_3 and either of #39_1/39_2/39_3/39_4 to the sockets S1 and S2 respectively along with the ethernet cable and power-up again.

Access the board over the serial console only and check the LTPP3G2 board gets the IP address from the DHCP server, note the IP Address now as you will need it later while setting up the VS code.
VS Code:
Installed the VS Code application on your computer along with the extensions like "Remote SSH", "python" and "python extension pack".
After that, you need to follow the getting started guide on Tibbo’s website to establish successful communication between the LTPP3G2 board and VS Code application.
The necessary steps are shared here https://tibbo.com/store/tps/ltpp3g2/ubuntu-start.html under the section called “Setting up Visual Studio Code (VSC)”.
Designate and separate folder on your computer for all the files relating to the LTPP3G2 board.
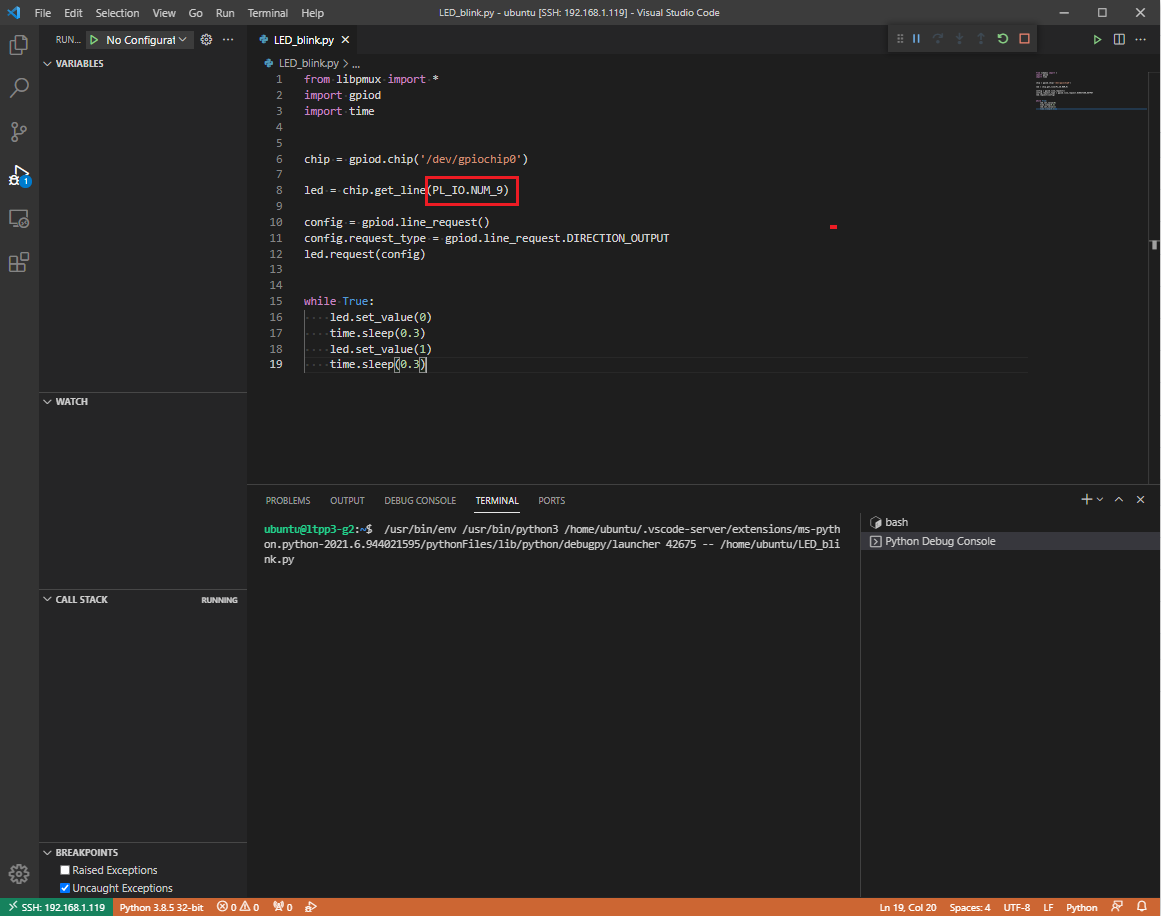
Download the files attached to this article "LED_blink.py" onto your computer and then to the LTPP3G2 board.
Project Steps:
- Connect the VS Code to LTPP3G2 over SSH session for remote debugging of python (https://tibbo.com/store/tps/ltpp3g2/ubuntu-start.html)
- Update the repository using apt-get (update and upgrade) and reboot the system, this is an auto-install pinmux library called "libpmux" that allows you to do pin muxing
- Install gpiod using “pip3 install gpiod” or “sudo apt-get install python3-libgpiod”
- As you have access to the LTPP3G2 board over VS Code, you can debug the python script “LED_blink.py” and test the LED function
The final results will blink the LED on the board.
Comments
0 comments
Please sign in to leave a comment.